← All articles · Photo editing course · Part 1 of 12 · about 3 min read
The workspace, decoded: every panel and tool you actually need (Part 1)
Opening a Photoshop-class editor for the first time is a bit like sitting in someone else's car: the controls are all there, just not where your hands expect them. This part fixes that in about six minutes. By the end you will know where everything lives, which three panels you will use on every single edit, and the eight shortcuts that do most of the work.
Open the online photo editor in a second tab and follow along. Nothing here is destructive, so you can click around freely.
The five regions of the screen
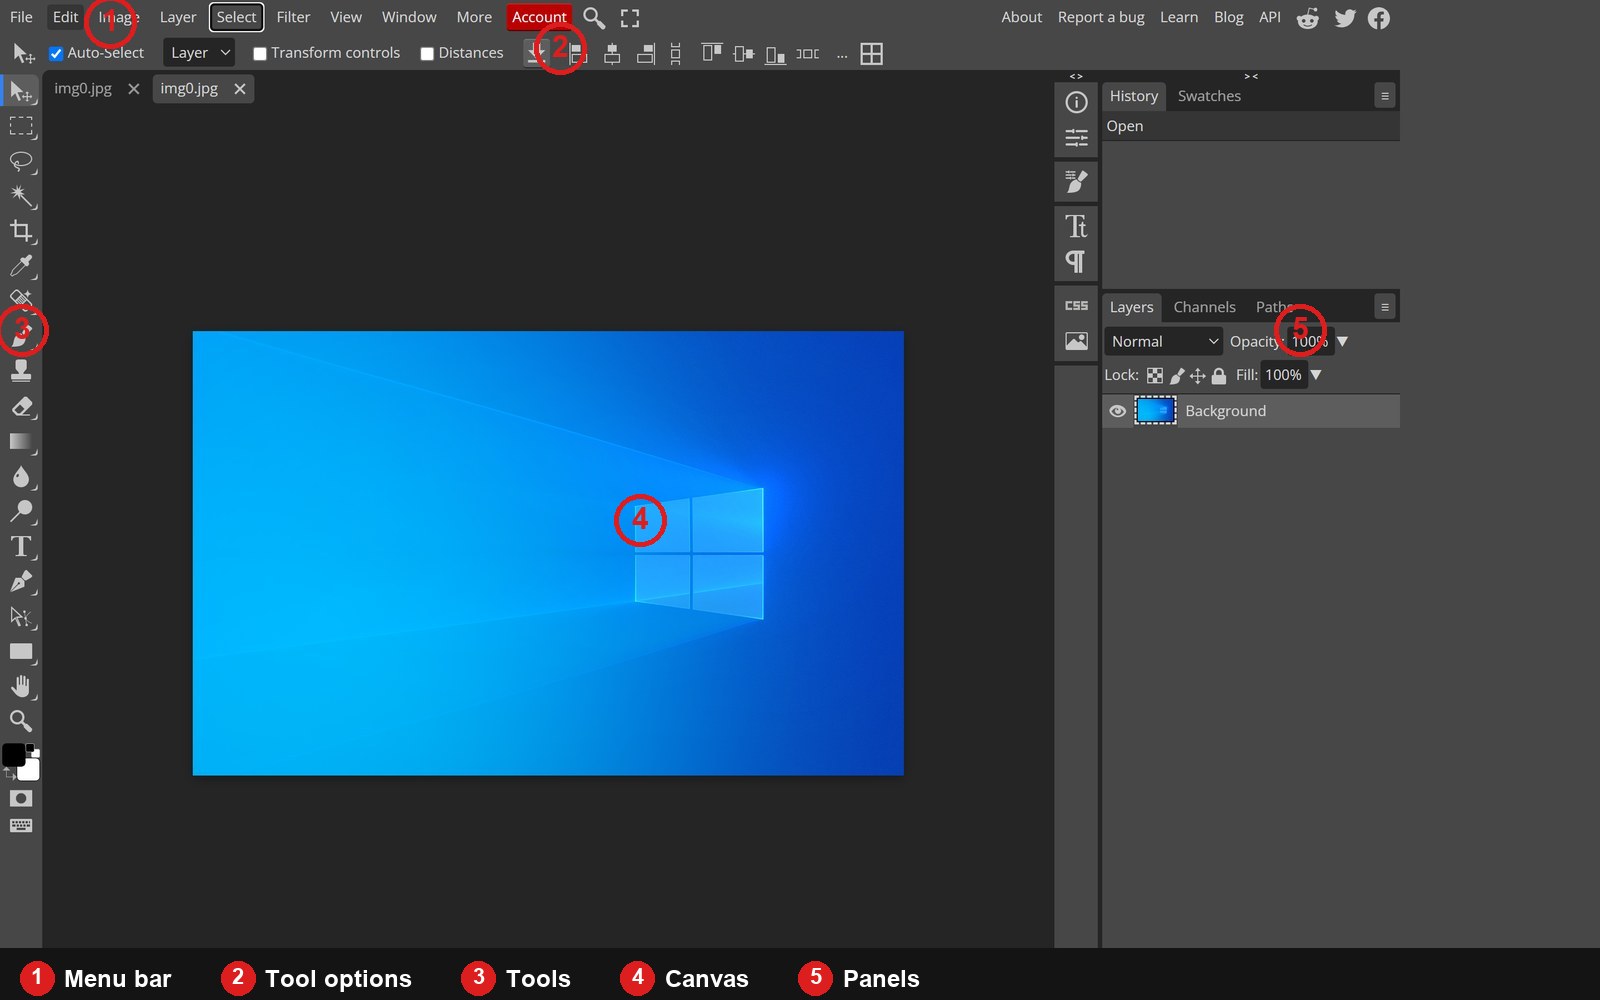
Every serious image editor uses the same five-part layout, and this one is no exception. Across the top: menus (File, Edit, Image, Layer, Select, Filter, View, Window, Help). Below them: the options bar, which changes to match whichever tool is active — pick the crop tool and it asks for a ratio, pick the brush and it asks for size and hardness.
Down the left side sits the toolbar, grouped by job: selection at the top, crop and eyedropper, then painting and healing, then vector/text, then navigation at the bottom. The large middle area is the document window — your canvas, with a tab per open file. On the right, panels: Layers, Channels, Paths, History, and a properties area that follows your selection.
Which tools to learn first
Do not try to learn forty tools. Six cover almost everything a normal person does: Move (V) to reposition layers, Marquee (M) and Lasso (L) to select, Crop (C) to reframe, Brush (B) to paint and to paint on masks, Type (T) for text, and Zoom (Z) with the space bar for navigation.
The rest — pen, gradient, dodge and burn, shape, slice — you learn the day a job needs them. That is the honest order of learning, and it beats watching a four-hour course you will not remember.
The three panels that do the real work
Layers is the heart of the editor. Every element you add becomes a row, stacked bottom to top, each with its own visibility toggle, opacity and blend mode. If something seems to have no effect, the usual reason is that you are painting on the wrong layer — check the highlight in this panel first, always.
History records your steps. Unlike Ctrl+Z, which walks back one change at a time, the history list lets you jump to any earlier state in one click. I keep it open permanently; it is the seatbelt of editing. Properties is the third: adjust a text layer's font, a shape's fill, or an adjustment layer's curve without hunting through menus.
Eight shortcuts worth memorising
V move · M marquee · L lasso · C crop · B brush · T type · Ctrl+J duplicate layer · Ctrl+0 fit on screen. Add space+drag to pan, [ and ] to shrink or grow the brush, and Ctrl+Alt+Z for step-backwards history.
That is genuinely enough to work at speed. The one habit worth building immediately: duplicate the layer before you retouch it (Ctrl+J). It costs a keystroke and saves entire afternoons.
Arranging the workspace for your screen
On a laptop, collapse the right-hand panels you are not using and drag the Layers panel taller — a short Layers list means constant scrolling on a ten-layer document. On a desktop with a second monitor, pull the editor into full screen using the Fullscreen button above the canvas; the browser chrome costs you about 90 pixels of height, which matters when you are judging a crop.
If the interface feels cramped inside a normal browser window, that is exactly what the fullscreen control is for. Press F to toggle it, Esc to come back.
Tools used in this part
❓ Frequently asked questions
Do I need an account to use the editor?
No. The editor opens straight from the page. There is no sign-up, no login and no cloud project — files stay in your browser.
Does it work on a phone or tablet?
Yes, but the layout is designed for a mouse. On a phone, rotation and cropping are fine; precision masking is not. Use a tablet with a stylus at minimum for retouching.
Will my Photoshop keyboard shortcuts work?
The core ones do — V, M, L, C, B, T, Ctrl+J, Ctrl+Z, Ctrl+0. Some plugin and script shortcuts do not, because this is a browser build.